8.1: Notifications
Contents:
- Introduction
- What is a notification?
- Creating notifications
- Delivering notifications
- Reusing notifications
- Clearing notifications
- Notification compatibility
- Notification design guidelines
- Related practical
- Learn more
In this chapter you learn how to create, deliver, and reuse notifications, and how to make them compatible for different Android versions.
What is a notification?
A notification is a message your app displays to the user outside your application's normal UI. When you tell the system to issue a notification, the notification first appears to the user as an icon in the notification area, on the left side of the status bar.

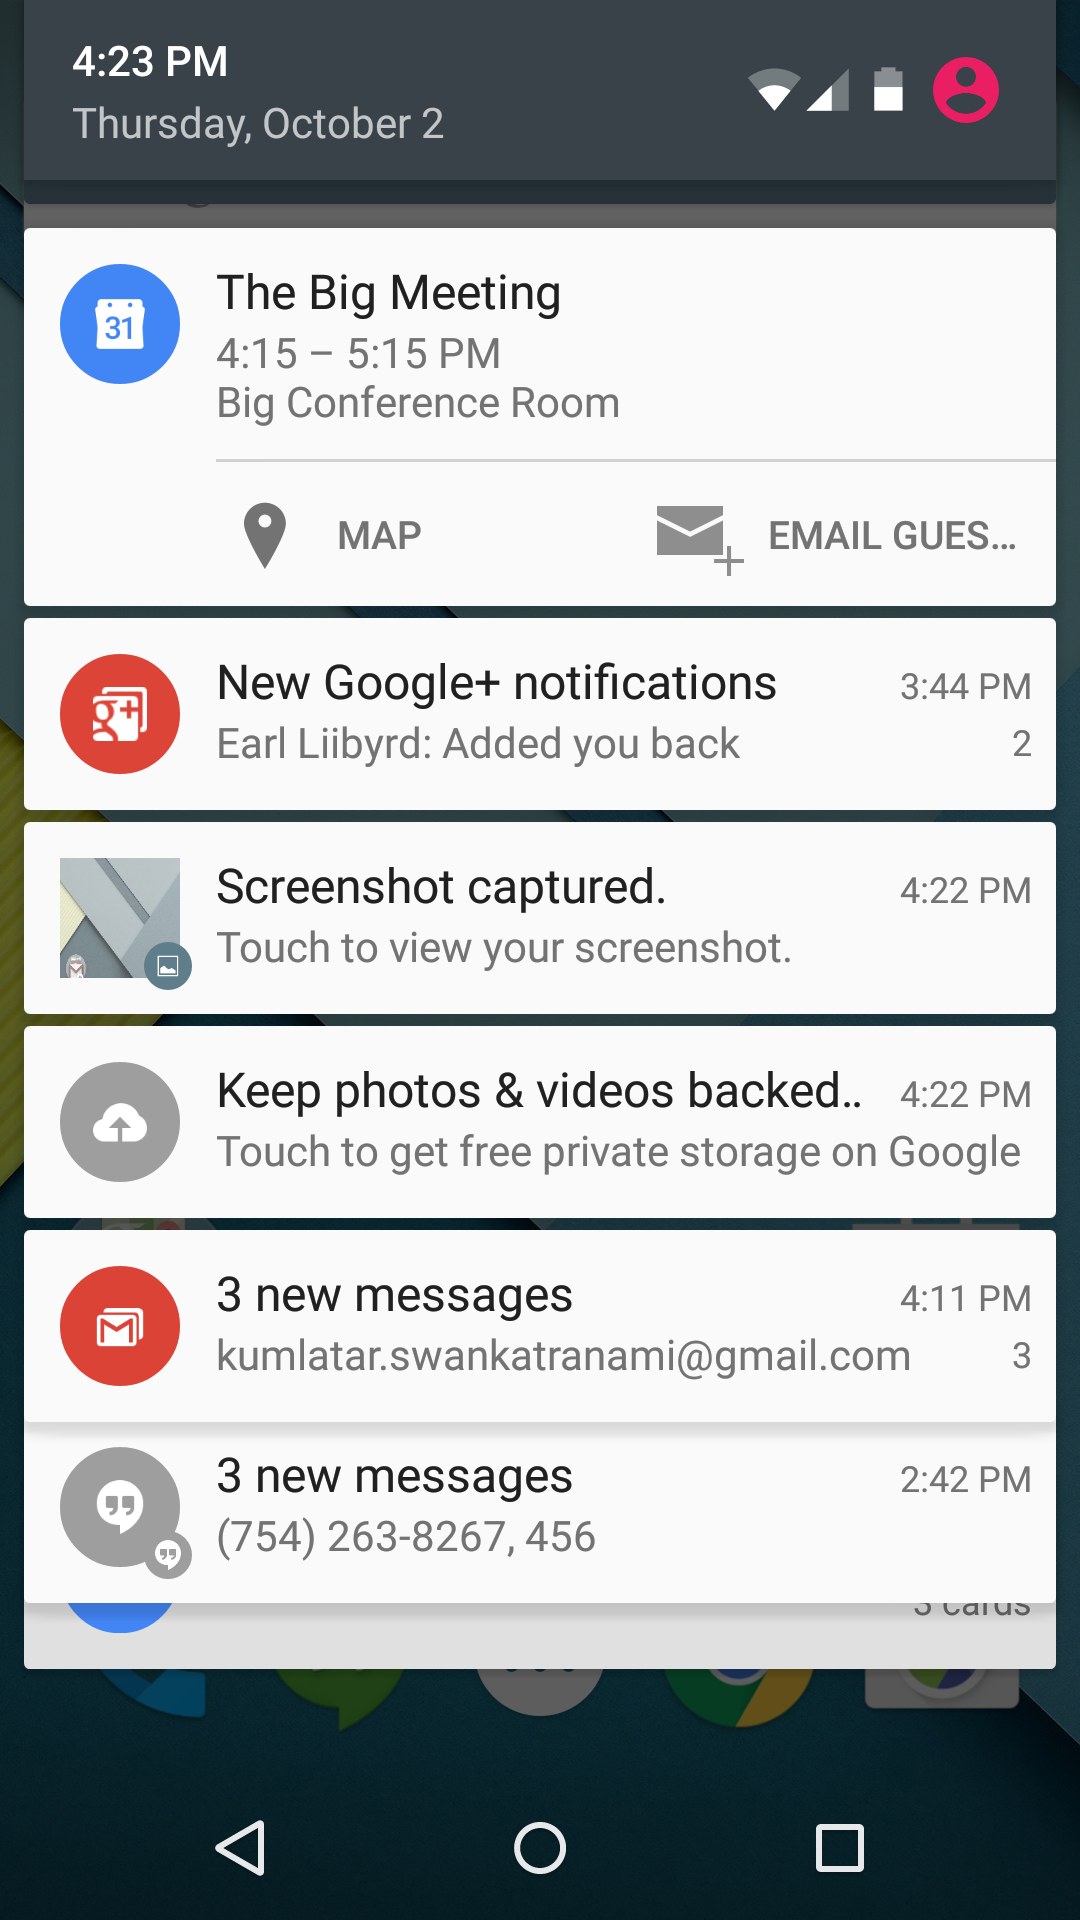
To see the details of the notification, the user opens the notification drawer, or views the notification on the lock screen if the device is locked. The notification area, the lock screen, and the notification drawer are system-controlled areas that the user can view at any time.

The screenshot shows an "open" notification drawer. The the status bar isn't visible, because the notification drawer is open.
This process is described below.
Creating notifications
You create a notification using the NotificationCompat.Builder class. (Use NotificationCompat for the best backward compatibility. For more information, see Notification compatibility.) The builder classes simplify the creation of complex objects.
To create a NotificationCompat.Builder, pass the application context to the constructor:
NotificationCompat.Builder mBuilder = new NotificationCompat.Builder(this);
Setting notification components
When using NotificationCompat.Builder, you must assign a small icon, text for a title, and the notification message. You should keep the notification message shorter than 40 characters and not repeat what's in the title. For example:
NotificationCompat.Builder mBuilder =
    new NotificationCompat.Builder(this)
    .setSmallIcon(R.drawable.notification_icon)
    .setContentTitle("Dinner is ready!")
    .setContentText("Lentil soup, rice pilaf, and cake for dessert.");
You also need to set an Intent that determines what happens when the user clicks the notification. Usually this Intent results in your app launching an Activity.
To make sure the system delivers the Intent even when your app isn't running when the user clicks the notification, wrap the Intent in a PendingIntent object, which allows the system to deliver the Intent regardless of the app state.
To instantiate a PendingIntent, use one of the following methods, depending on how you want the contained Intent to be delivered:
- To launch an Activity when a user clicks on the notification, use
PendingIntent.getActivity(), passing in an explicitIntentfor the Activity you want to launch. ThegetActivity()method corresponds to anIntentdelivered usingstartActivity(). - For an
Intentpassed intostartService()(for example a service to download a file), usePendingIntent.getService(). - For a broadcast
Intentdelivered withsendBroadcast(), usePendingIntent.getBroadcast().
Each of these PendingIntent methods take the following arguments:
- The application context.
- A request code, which is a constant integer ID for the
PendingIntent. - The
Intentto be delivered. - A
PendingIntentflag that determines how the system handles multiplePendingIntentobjects from the same application.
For example:
Intent contentIntent = new Intent(this, ExampleActivity.class);
PendingIntent pendingContentIntent = PendingIntent.getActivity(this, 0,
    contentIntent, PendingIntent.FLAG_UPDATE_CURRENT);
mBuilder.setContentIntent(pendingContentIntent);
To learn more about PendingIntent, see the PendingIntent documentation.
Optional components
You can use various options with notifications, including:
- Notification actions
- Priorities
- Expanded layouts
- Ongoing notifications
For other options you can use with notifications, see the NotificationCompat.Builder reference.
Notification actions
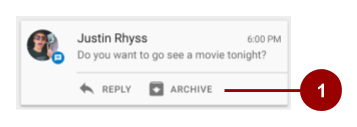
A notification action is an action that the user can take on the notification. The action is made available via an action button on the notification. Like the Intent that determines what happens when the user clicks the notification, a notification action uses a PendingIntent to complete the action. The Android system usually displays a notification action as a button adjacent to the notification content. Starting with Android 4.1 (API level 16), notifications support icons embedded below the content text, as shown in the screenshot below.

- This notification has two actions that the user can take, "Reply," or "Archive." Each has an icon.
To add a notification action, use the addAction() method with the NotificationCompat.Builder object. Pass in the icon, the title string and the PendingIntent to trigger when the user taps the action. For example:
mBuilder.addAction(R.drawable.car, "Get Directions", mapPendingIntent);
To ensure that an action button's functionality is always available, follow the instructions in the Notification compatibility section, below.
Notification priority
Android allows you to assign a priority level to each notification to influence how the Android system will deliver it. Notifications have a priority between MIN (-2) and MAX (2) that corresponds to their importance. The following table shows the available priority constants defined in the Notification class.
Priority Constant |
Use |
PRIORITY_MAX |
For critical and urgent notifications that alert the user to a condition that is time-critical or needs to be resolved before they can continue with a time-critical task. |
PRIORITY_HIGH |
Primarily for important communication, such as messages or chats. |
PRIORITY_DEFAULT |
For all notifications that don't fall into any of the other priorities described here. |
PRIORITY_LOW |
For information and events that are valuable or contextually relevant, but aren't urgent or time-critical. |
PRIORITY_MIN |
For nice-to-know background information. For example, weather or nearby places of interest. |
To change the priority of a notification, use the setPriority() method on the NotificationCompat.Builder object, passing in one of the above constants.
mBuilder.setPriority(Notification.PRIORITY_HIGH);
Notifications can be intrusive. Using notification priority correctly is the first step in making sure that your users don't uninstall your app because it's too distracting.
Peeking
Notifications with a priority of HIGH or MAX can peek, which means they slide briefly into view on the user's current screen, no matter what apps the user is using. Note that on devices running Android 6.0 and higher, users can block peeking by changing the device's "App notification" settings. This means you can't rely on notifications peeking, even if you set them up that way.
To create a notification that can peek:
- Set the priority to
HIGHorMAX. - Set a sound or light pattern using the
setDefaults()method on the builder, passing theDEFAULTS_ALLconstant. This gives the notification a default sound, light pattern, and vibration.NotificationCompat.Builder mBuilder = new NotificationCompat.Builder(this) .setSmallIcon(R.drawable.notification_icon) .setContentTitle("My notification") .setContentText("Hello World!") .setPriority(PRIORITY_HIGH) .setDefaults(DEFAULTS_ALL);
Expanded view layouts
Notifications in the notification drawer appear in two main layouts, normal view (which is the default) and expanded view. Expanded view notifications were introduced in Android 4.1. Use them sparingly, because they take up more space and attention than normal view layouts.
To create notifications that appear in an expanded layout, use one of these helper classes:
- Use
NotificationCompat.BigTextStylefor large-format notifications that include a lot of text. - Use
NotificationCompat.InboxStylefor large-format notifications that include a list of up to five strings. - Use
Notification.MediaStylefor media playback notifications. There is currently noNotificationCompatversion of this style, so it can only be used on devices with Android 4.1 or above. See the Notification compatibility section for more information. - Use
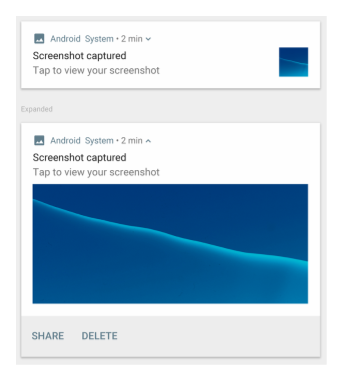
NotificationCompat.BigPictureStyle, shown in the screenshot below, for large-format notifications that include a large image attachment.
For example, here's how you'd set the BigPictureStyle on a notification:
NotificationCompat notif = new NotificationCompat.Builder(mContext)
    .setContentTitle("New photo from " + sender.toString())
    .setContentText(subject)
    .setSmallIcon(R.drawable.new_post)
    .setLargeIcon(aBitmap)
    .setStyle(new NotificationCompat.BigPictureStyle()
        .bigPicture(aBigBitmap)
        .setBigContentTitle("Large Notification Title"))
    .build();
To learn more about implementing expanded styles, see the NotificationCompat.Style documentation.
Ongoing notifications
Ongoing notifications are notifications that can't be dismissed by the user. Your app must explicitly cancel them by calling cancel() or cancelAll(). Creating multiple ongoing notifications is a nuisance to your users since they are unable to cancel the notification. Use ongoing notifications sparingly.
To make a notification ongoing, set setOngoing() to true. Use ongoing notifications to indicate background tasks that the user actively engages with (such as playing music) or tasks that occupy the device (such as file downloads, sync operations, and active network connections).
Delivering notifications
Use the NotificationManager class to deliver notifications:
- Call
getSystemService(), passing in theNOTIFICATION_SERVICEconstant, to create an instance ofNotificationManager. - Call
notify()to deliver the notification. In thenotify()method, pass in these two values:- A notification ID, which is used to update or cancel the notification.
- The
NotificationCompatobject that you created using theNotificationCompat.Builderobject.
The following example creates a NotificationManager instance, then builds and delivers a notification:
mNotifyManager = (NotificationManager)
getSystemService(NOTIFICATION_SERVICE);

//Builds the notification with all the parameters
NotificationCompat.Builder notifyBuilder = new NotificationCompat.Builder(this)
       .setContentTitle(getString(R.string.notification_title))
       .setContentText(getString(R.string.notification_text))
       .setSmallIcon(R.drawable.ic_android)
       .setContentIntent(notificationPendingIntent)
       .setPriority(NotificationCompat.PRIORITY_HIGH)
       .setDefaults(NotificationCompat.DEFAULT_ALL);

//Delivers the notification
mNotifyManager.notify(NOTIFICATION_ID, notifyBuilder.build());
Reusing notifications
When you need to issue a notification multiple times for the same type of event, you can update a previous notification by changing some of its values, adding to it, or both.
To reuse an existing notification:
- Update a
NotificationCompat.Builderobject and build aNotificationobject from it, as when you first created and built the notification. - Deliver the notification with the same ID you used previously.Important: If the previous notification is still visible, the system updates it from the contents of the
Notificationobject. If the previous notification has been dismissed, a new notification is created.
Clearing notifications
Notifications remain visible until one of the following happens:
- If the notification can be cleared, it disappears when the user dismisses it individually or by using "Clear All."
- If you called
setAutoCancel()when you created the notification, the notification disappears when the user clicks it. - If you call
cancel()for a specific notification ID, the notification disappears. - If you call
cancelAll(), all the notifications you've issued disappear.
Because ongoing notifications can't be dismissed by the user, your app must cancel them by calling cancel() or cancelAll().
Notification compatibility
To ensure the best compatibility, create notifications with NotificationCompat and its subclasses, particularly NotificationCompat.Builder.
Keep in mind that not all notification features are available for every Android version, even though the methods to set them are in the support library class NotificationCompat.Builder. For example, expanded view layouts for notifications are only available on Android 4.1 and higher, but action buttons depend on expanded view layouts. This means that if you use notification action buttons, they don't show up on devices running anything before Android 4.1.
To solve this:
Don't rely on notification action buttons to carry out a notification's action; instead make the action available in an Activity. You may want to add a new Activity to do this.
For example, if you set a notification action that provides a control to stop and start media playback, first implement this control in an Activity in your app.
Have the Activity start when users click the notification. To do this:
Create a
PendingIntentfor the Activity.Call
setContentIntent()to add thePendingIntentto the notification.
- Use
addAction()to add features to the notification as needed. Remember that any functionality you add also has to be available in the Activity that starts when users click the notification.
Notification design guidelines
Notifications always interrupt the user. As such they must be short, timely, and most of all, relevant.
- Relevant: Ask yourself whether this information is essential for the user. What happens if they don't get the notification? For example, scheduled calendar events are likely relevant.
- Timely: Notifications need to appear when they are useful. For example, notifying the user when it's time to leave for an appointment is useful.
- Short: Use as few words as possible. Now, challenge yourself to say it with fewer.
Give users the power to choose:
- Provide settings in your app that allow users to choose the kinds of notifications they want to receive, and how they want to receive them.
In addition to these basic principles, notifications have their own design guidelines:
- To learn how to design notifications and their interactions, see the Material Design notification patterns documentation.
- To learn how to design notifications and their interactions for older Android versions, see Notifications, Android 4.4 and Lower.
- For important details about Material Design changes introduced in Android 5.0 (API level 21), see the Material Design training.
Related practical
The related exercises and practical documentation is in Android Developer Fundamentals: Practicals.
Learn more
Guides
Reference
